

How To Make Animations In Unity 5
Well-nigh this book
This recipe-based practical guide volition bear witness you lot how to unleash the power of blitheness in Unity 5.x and make your games visually impeccable. Our primary focus is on showing you tools and techniques to animate not only humanoid biped characters, but also other elements. This includes non-humanoid character animation, game world creation, UI element animation, and other key features such equally opening doors, changing lights, transitioning to unlike scenes, using physics, setting upwardly ragdolls, creating destructible objects and more.
While discussing these topics, the book will focus on mecanim, the Unity 3D animation tool, and how yous tin employ it to perform all these tasks efficiently and chop-chop. It contains a downloadable Unity projection with interactive examples for all the recipes. By the end of this book, you will be confident and cocky-sufficient in animating your Unity 3D games efficiently.
- Publication date:
- May 2016
- Publisher
- Packt
- Pages
- 328
- ISBN
- 9781785883910
Chapter 1. Working with Animations
This chapter explains the essentials of working with animations in Unity and covers the following topics:
- Importing skeletal animations
- Configuring generic and humanoid rigs
- Creating and assigning an Animator Controller
- Creating animation transitions in Animator Controller
- Using parameters to command the animation flow
- Using animations from multiple assets
- Looping mirroring and offsetting animations
- Adjusting the playback speed of animations
- Using override Animator Controllers to animate different types of characters
- Importing object animation from a 3D bundle
Introduction
Unity is a dandy game engine that implements the animate everything philosophy, which allows yous to visualize even the most creative gameplay ideas. Through the course of this volume, we volition learn a variety of recipes that will help you unleash the power of Unity 5.ten animation tools and brand your games more fun.
In this first chapter, we will get more familiar with using skeletal animations in Unity. It volition guide you through the procedure of importing such animations, editing them, and assigning them to your in game characters. This knowledge is essential for understanding recipes described in further chapters.
Importing skeletal animations
This first recipe shows how to import a skeletal animation from a 3D parcel. It assumes that you have an animation already prepared. We are going to bring the file to Unity and show where you can adjust the import settings. We will not bound into too much detail for now to brand the import process as quick as possible. Nosotros volition cover all the settings in further recipes.
Getting ready
Most animations are created in external 3D packages such as Maya, 3ds Max, Motion Architect, or Blender 3D. Make sure you have prepared a 3D model with a skeleton, the model is skinned, and y'all take created at least one blitheness. You can also download the provided case; open the project in Unity and go to this folder: Chapter 01 Working with animations\Recipe 01 Importing skeletal animations\Sheep Model. You volition find an imported FBX file calledSheep.fbx there.
How to practise it...
To import a skeletal blitheness, you need to follow these steps:
- Export a skinned model and its skeleton (chosen rig in Unity) to FBX format.
Note
If yous are using Blender, you don't have to manually export the file to FBX format. Simply elevate and drop the file to your Avails folder. Unity will use Blender FBX exporter in the background. Additionally, you volition be able to open the file past double-clicking on it in Unity. Subsequently you lot edit and save information technology, Unity will reimport information technology again. It is a very convenient way of editing animations as y'all don't take to go through the consign-import process each time you make a change.
- Drag and drop the exported file into whatever subfolder in the
Assetsfolder in your projection or get toAssets|Import new assetand choose your FBX file.
- Select the imported file and navigate to the
Inspectortab. Click on theRigbutton:
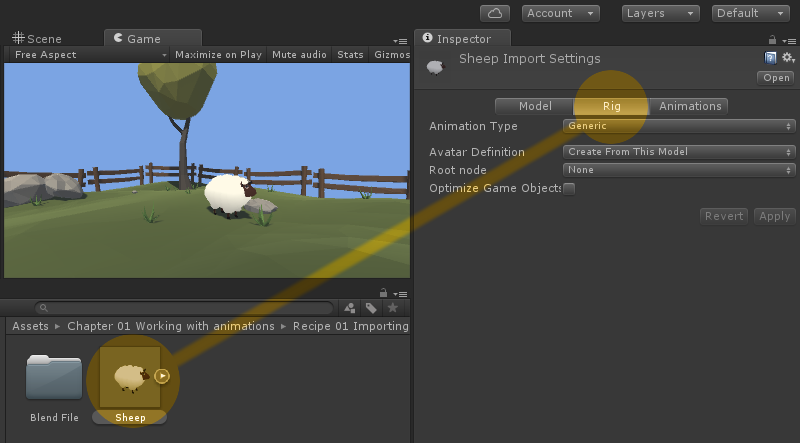
- Here you can specify the type of the rig to utilise. For bipedal characters, use the
Humanoidoption, for all the rest chooseGeneric. We use a sheep model in this case, and so we demand to choose theGenericrig. Differences between those options are described in the How it works section. - Get out all the other inputs as defaults.
- Click on the
Animationsbutton. If anUnapplied import settingswindow appears, click onApply.
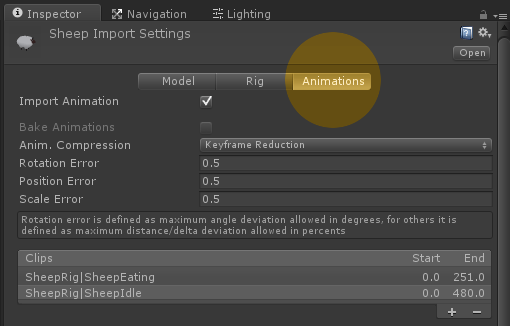
- Make sure the
Import Animationcheckbox is checked. - Click on the
Utilisepush in the lower right corner of theInspector(just above theBlitheness Preview). You may demand to scroll theInspectordown.
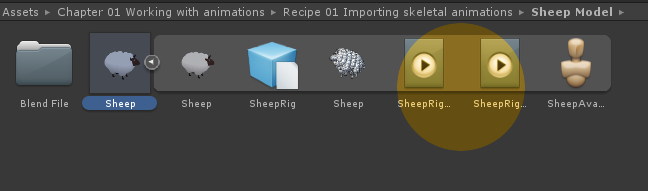
- Y'all should be able to see all imported animation clips every bit child assets of your imported FBX file.
How it works...
Unity uses four dissimilar rig configurations:
-
Genericrig: This one is used for quadrupedsouthward, spiders, and other non-humanoid characters. Information technology uses Unity'due south Mecanim system for decision-making animation flow. It can use root motion if you provide aRoot node—a bone responsible for character movement. -
Humanoidrig: This one is used for humanoid characters only. It besides uses Mecanim system for controlling blitheness. If you are usingHumanoidrigs, you lot have more than options for importing animations. The biggest advantage is automatic animation retargeting—you can use the same animation clip on various types of humanoid characters (for example, a dwarf and a troll). -
Legacy: This option is used mostly for astern compatibility with previous versions of Unity. It is similar to theGenericrig but uses scripts instead of Mecanim for decision-making animation menstruum. I recommend usingGenericrig instead. -
None: This last option turns off the rig and disables animation import.
We will hash out differences betwixt Generic and Humanoid rigs farther in the next recipe.
There'due south more...
- Imported blitheness clips are also listed in the
Clipssection of theAnimationstab.
- You can add new clips by clicking on the plus push below the
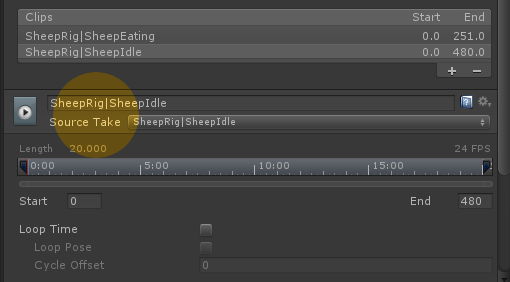
Clipsdepartment. Yous can also remove clips past clicking on the minus button. - You can rename each clip by using the input field above the
Source Takedrop-down carte. - Yous can choose the source take (the blitheness stored in your FBX file) for each animation clip with the
Source Takedrop-downward card. - Y'all can also trim the blitheness clip by editing the
CommencementandEndinput fields.
Note
If yous are using Blender, make sure to rotate the rig -xc degrees in the X axis, employ the rotation in Blender and then rotate information technology again, +xc degrees in the 10 axis. The rotation of the rig in Blender should exist: 90 X , 0 Y , and 0 Z . Your model should be facing the -Y axis in Blender (when you modify the view to Front end , you should encounter the face up of your grapheme). Blender and Unity use different axes alignment: in Blender, Z is upward and Y is back; in Unity Z , is front and Y is up. This little trick solves the trouble. Your model afterward import should accept 0 rotation and should be facing the Z centrality. It is important for moving objects (such equally characters) and rig configuration. If you don't practice this, your model will have -90 X rotation after the import.
Configuring generic and humanoid rigs
This recipe shows how to configure two nigh oftentimes used rig types: Generic and Humanoid . We volition become through all the bachelor options for both of them.
Getting set
As previously mentioned, make sure you have prepared two animated characters. One of them should be a humanoid and the other a non-humanoid, a quadruped for instance. You can also download the provided example Unity projection and go to theChapter 01 Working with animations\Recipe 02 Configuring generic and humanoid rigs\Rigs directory.
You volition discover there three FBX files:
-
Generic.fbx -
Humanoid.fbx -
Quadruped.fbx
If you are creating your characters from scratch, the bones hierarchy of your humanoid rig is important for Unity to recognize the rig every bit a humanoid. It should follow this blueprint:
HIPS -> SPINE -> CHEST -> Neck -> Caput Head -> EYE (for left and right eyes) Head -> JAW HIPS -> UPPER LEG -> LOWER LEG -> Foot -> TOES (for left and right legs) CHEST -> SHOULDER -> ARM -> FOREARM -> Manus (for left and right hands) HAND -> PROXIMAL -> INTERMEDIATE -> DISTAL (for 5 fingers in left and right easily)
The hip bone is the root bone of the humanoid character. Fingers, shoulders, chest, neck, eyes, jaw, and toes are optional bones. Your humanoid graphic symbol will work without them.
You should besides remember to model the character in a T-POSE. It should face the Z axis in Unity (if your 3D software uses unlike axis alignment from Unity'due south like Blender, call up about the -90 and +xc degrees rotation trick shown in the Importing skeletal animations recipe). Hands of the character should be flat, palm down, and parallel to the basis along the X axis. A-POSE characters will too work.
How to do it...
To configure a generic rig you need to follow these steps:
- Import your animated asset into Unity the aforementioned way as in the Importing skeletal animations recipe.
- Select the nugget and choose the
Rigtab in theInspector. Then select theGenericpick in theAnimation Tabdrop-downwardly menu. If you are using the provided example Unity Project, select theGeneric.fbxfile in theChapter 01 Working with animations\Recipe 02 Configuring generic and humanoid rigs\Rigsdirectory. - Cull the
Create From This Modelpick from theAvatar Definitiondrib-downwards menu. - Exit the
Root Nodechoice set toNone. - Leave the
Optimize Game Objectsoption unchecked. - Click on the
Applypush to complete the configuration.
Humanoid rig configuration has a lot more options:
- Showtime, import your skinned humanoid model to Unity the same fashion as in the Importing skeletal animations recipe.
- Select the asset and choose the
Rigtab in theInspector. So select theHumanoidoption in theAnimation Tabdrop-down menu. If you lot are using the provided example Unity Project, select theHumanoid.fbxfile in theChapter 01 Working with animations\Recipe 02 Configuring generic and humanoid rigs\Rigsdirectory. - Choose the
Create From This Modeloption from theAvatar Definitiondriblet-downwardly menu. - Go out the
Optimize Game Objectsoption unchecked. - Click on the
Applybutton. - You should see a
Configurebutton with a tick icon near to information technology.

- The tick icon shows that Unity was able to automatically recognize the rig hierarchy as a humanoid. If Unity fails to recognize it, automatically a cross will exist displayed instead of the tick. If you are using the provided example, y'all can detect it when you lot try to set the rig to
Humanoidfor theGeneric.fbxfile.
Note
Some quadruped characters can exist mistaken by Unity for humanoids. Yous can find a Quadruped.fbx file in the provided example Unity project. Theoretically, you tin can fix its rig to Humanoid , and Unity will recognize it every bit valid. This, however, is a error—all quadruped characters' rigs should be set to Generic . Setting them equally humanoids can cause bug later.
- Click on the
Configurepush to enter theAvatar Configuration Inspector. A new scene will exist opened. You should be able to see your model in thesceneand bonemappingsection in theInspectortab.

- Make sure you lot are in the
Mappingsection ( 1 ). All recognized and assigned bones are shown as green trunk parts on the displayed dummy character. If a required bone is missing or is not assigned, it will show up as crimson. You tin can navigate between theBody,Caput,Left Paw, andRight Handsections by clicking on a respective button ( 2 ). All bones are displayed in a list ( iii ) for each department. Required bones are marked with circle icons and optional bones are marked with dotted circle icons. - Yous tin change the bone assignment past dragging a bone from the
Bureaucracytab and dropping it onto a respective bone slot in theInspectortab. Unity will occasionally miss a os or two (especially fingers); thus, yous should always check the bone consignment manually. - If your character is not in a T-POSE (is modeled in an A-POSE for instance), a
Graphic symbol is not in T-POSEmessage volition be displayed in the scene view and the character's bones volition show upwards in crimson. Unity needs the grapheme in a T-POSE for proper humanoid avatar configuration. You lot can enforce that pose by choosing thePose|Enforce T-POSEoption, found beneath the bonesmappinglist.

- Click on the
Utilizebutton and then theDonebutton to finish configuration.
How it works...
Humanoid rig uses more advanced Mecanim features than the Generic rig. You tin find the listing of such features below:
- Automated retargeting : This is i of the most important differences between those ii rigs. The
Humanoidrig uses automatic retargeting, which ways that you tin can accept the aforementioned animations on different humanoid characters. Your characters can share a group of animations (basic movement or some common actions). Information technology gives y'all the possibility to buy your animation assets from the Nugget Shop and easily use them on your characters.Genericrigs don't support this feature. You have to prepare animations for your specific rig or retarget them in a 3D packet. - Changed kinematics : This feature lets yous control your characters' anxiety and easily position with scripting. It is useful for making your characters stand on uneven basis or grab an object in the scene. It is a built-in characteristic forHumanoid rigs in Unity.
Genericrigs have to utilise custom-fabricated solutions. - Avant-garde animation settings :Humanoid rigsouthward have more settings for animation import, such every bit the
mirroroption. We will discuss them in depth in the Looping mirroring and offsetting animations recipe. - Await at : Unity has a built-in solution for humanoid characters looking at something. You have to write custom systems for generic characters.
- Additional basic : A lot of people think that they cannot use additional bones with
Humanoidrigs. It is not true. If your rig has an animated weapon slot for instance, you lot can nonetheless use it with theHumanoidrig. All you need to do is to detect theMasksection in your animation import settings and enable the additional os for each animation it is used in (you need to use theTransformfoldout to observe your additional bone).
I highly recommend using Humanoid rigs for all humanoid characters in your game.
In that location's more...
- In theHumanoid rig configuration, you can find the
Muscles & Settingssection, where yous can preview and adjust the move (musculus) range for your grapheme.

- You lot can preview the range of motion in the
Muscle Grouping Previewsection by adjusting the sliders ( 1 ). You can preview the range of move per musculus in thePer-Muscle Settingsdepartment. You can too arrange the range here by unfolding a given musculus foldout and using the slider ( two ). In theAdditional Settingssection, you can adapt more options of your avatar. These are mainly responsible for the flexibility of your rig. You can set how much a bone can be stretched during animation for case. - The
Translation DoFpick enables animating basic transition in yourHumanoidrig. It is turned off past default, significant that only rotation of the basic is used in blitheness. - In the
Rigtab in themodel import settings, y'all tin can find some additional options:-
Avatar Definition: This option is responsible for creating a new avatar or copying the avatar from another model. The 2d option is useful for storing animations in multiple files. It will be discussed farther in the Using animations from multiple assets recipe. -
Optimize Game Objects: This option lets yous hide all bones from theHierarchyview. The number of game objects in the game has an affect on the performance. You can even so choose a number of bones that will be displayed in theHierarchy. Information technology is useful for having exposing weapon slots and similar gameplay-related basic while hiding others. -
Root node: This option is visible only forGenericrigs. It lets you cull the bone responsible for root motion calculation. We will discuss it farther inChapter four, Graphic symbol Motion .
-
Creating and assigning an Animator Controller
Animator Controllers are land machines (graphs) responsible for controlling the flow of animations of whatever animated object in the game. The same Animator Controller asset can be used by multiple objects or characters. Unity will create an independent runtime re-create of the asset for each animated object it is assigned to.
Getting set up
Every bit e'er, you should accept a rigged and animated character prepare before nosotros start. Import information technology into Unity, cull the proper rig type, and put it into a scene. You lot can download the example Unity projection and go to the Chapter 01 Working with animations\Recipe 03 Creating and assigning an animator controller directory. There is a scene chosenExample.unity at that place. If you open it, y'all'll discover a Sheep character in the Hierarchy . It has an Animator Controller already created and assigned. Y'all tin also use theQuadruped.fbx file from theAffiliate 01 Working with animations\Recipe 03 Creating and assigning an animator controller\Rigs directory to follow the recipe pace by step.
How to do it...
To create and assign an Animator Controller, follow these steps:
- Navigate to the
Project View(whatever directory in theAssetsfolder) and press the right mouse push button. - Choose
Create|Animator Controllerfrom the menu. A controller asset will be created. Yous can name it equally you wish. - Double-click on the created controller. An
Animatortab will appear. Information technology will show the electric current selectedAnimator Controller.
- Hither you can add together the first animation. Navigate to your imported grapheme in the
Project View. Unfold it and drag and drop one of the imported animations into theAnimatorwindow. A new state will exist created and will be colored orange, showing that this is the default animation country—the state from which your graph starts.

- Navigate to your character on the scene and select it.
- Find theAnimator component in the
Inspectortab. All blithe objects have anAnimatorcomponent added automatically. - Notice the
Controllerslot in theAnimatorcomponent inspector. - Elevate and drop your
Animator Controllerasset into theControllerslot of theAnimatorcomponent. - Run the game to see your character play the default land animation of yourAnimator Controller. If the animation is non looped, it volition be played but one time and and so the character will freeze.
- Y'all tin can likewise select your grapheme in runtime and navigate to the
Animatortab to see what animation country the graphic symbol is currently in. Current animation state will take a bluish progress bar displayed.
How it works...
Every animated object in Unity uses an Animator component and an Animator Controller asset. The component is responsible for playing animations in runtime. It has a number of parameters that nosotros have to set or we can use to tweak the component'due south functionality:
-
Controller: This is the field we have to attach the Animator Controller asset to. It determines which animation graph the Animator component volition use.
-
Avatar: In Unity,Avatarsare rig definitions. For case, if we accept multiple files containing blithenesss with the sameGenericrig, we should utilise the sameAvatarfor all of them. Yous tin discover more information most information technology in the Using animations from multiple assets recipe. -
Apply Root Move: With this checkbox, we can turn the root motion on and off. It can be useful when we take animations with root move but don't desire to employ the root motion definition for a given character. -
Update Mode: This parameter tells Unity in which update the animations should be evaluated. TheNormaloption makes the animations synchronized with the normalUpdate()call, theAnimate Physicspick synchronizes animations with the physicsFixedUpdate()phone call, and theUnscaled Timechoice synchronizes the animation with the normalUpdate()call, but disables animation time scaling (the animation is played with 100 per centum speed regardless of theTime.timeScalevariable value). -
Culling Style: This parameter tells Unity when to plow off the blitheness playback on a given Animator. TheEver Animateoption makes the Animator e'er play animations (issue when off-screen), theCull Update Transformsoption culls Retarget and IK Transforms when the Animator is not visible on screen, and theCull Completelyoption disables the blitheness completely when the Animator is non visible on screen.
The Animator Controller asset stores a graph of animations (animation states) and defines the rules of switching between them, blending them, and so on. The controller (asset) is attached to the component's Controller field (the component is attached to a character prefab or a character placed in the scene). Many objects or characters can share the same Animator Controller if they use the same animations (have the same rigs or are humanoid characters).
See besides
If you lot want to larn how to create blitheness graphs and control their flow, encounter the next two recipes: Creating blitheness transitions in Animator Controller and Using parameters to control the blitheness flow .
Creating animation transitions in Animator Controller
As mentioned previously, Animator Controllers are state machines containing animations (states). Any given character can be in i such state (play one animation) at a fourth dimension. To switch between states (animations), you lot need to create land transitions.
Getting fix
Before we start, you should accept an animated model placed on a scene with an Animator Controller assigned. You can find such a model in the provided example Unity projection. Go to the Affiliate 01 Working with animations\Recipe 04 Creating blitheness transitions in Animator Controller directory. Open theExample.unity file. You will observe a Sheep object in the Hierarchy . Information technology has an Animator Controller assigned. You can open up it by double-clicking on the Controller field in the Animator component of the Sheep game object.
How to do it...
To create a land transition in an Animator Controller, follow these steps:
- Open the
Animator Controllerasset. - Add at least two states past dragging and dropping 2 animations into the
Animatorwindow. Yous tin can too bespeak the cursor at an empty space in theAnimatorwindow, press the right mouse button and selectCreate Land|Empty, then select the land, and add an animation to theMovementfield in theInspector. - Click on the correct mouse button on the land you want to transition from and choose
Brand Transition. - Drag the transition onto the state you desire to transition to and click the left mouse push.
- A default transition will be created. The state will switch later its animation has finished playing. To exist able to observe information technology in gameplay, make sure you transition from the default (orangish) state, equally only the default state volition play when the game starts.

How information technology works...
Country transitions ascertain how we can travel through the graph of animations. They are combined with transition conditions based on Animator Controller parameters; we will discuss the parameters in detail in the next recipe: Using parameters to control the animation flow . Each transition has a fix of properties we can adjust. Click on the transition (white arrow) to select it. You lot can discover the transition properties in the Inspector tab (brand sure to unfold the Settings foldout):
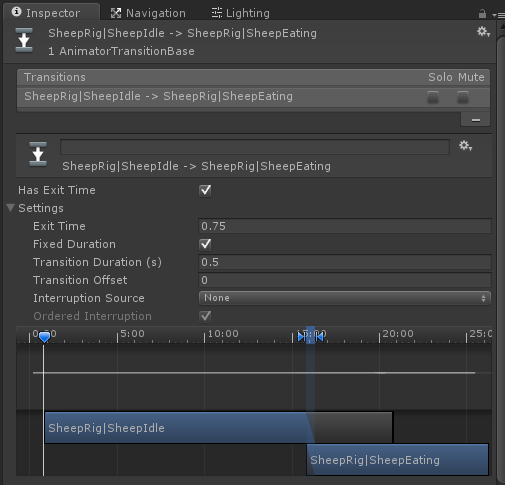
-
Has Exit Time: If set to true, this enables the transition only after a given pct of the animation has been already played. If disabled, the transition will take place instantly after its atmospheric condition are met. If you lot want to create a sequence of animations, set it to truthful. -
Exit Time: This is the pct (0-1 range) of the animation length later on which theHas Exit Timecondition is met. If yous set it to0.5, for instance, the state will transition after 50 percent of the blitheness was played. -
Stock-still Duration: This holding is combined with the next one,Transition Duration (s). If information technology's on, theTransition Duration (southward)is in seconds, and if it'south off, theTransition Elapsing (s)is in percent of the animation time. -
Transition Duration (due south): the time of the state transition. This is how long the animations will transition one into another. Animations are beingness blended together during the transition. Longer transitions are smoother, shorter, are more than abrupt. A good default value is around0.25.
-
Transition Offset: This offsets the target animation in fourth dimension. The value is in pct of the animation. Setting information technology to0.3ways that the target blitheness volition start from 30 percentage of its length instead of the beginning. -
Interruption Source: This setting tells Unity whether the transition tin can be interrupted by other transitions. You can set information technology to:-
None:the transition cannot exist interrupted by whatsoever other transition. -
Current State:The transition can be interrupted by transitions from the state we are trying to transition from . -
Next State:The transition can be interrupted by transition from the country we are trying to transition to . -
Current Country so Next Land:The transition tin can be interrupted past the transitions of the state we are trying to transition from or by the transitions of the land we are trying to transition to. The transitions from the country nosotros are trying to transition from accept the priority. -
Adjacent State then Current State:The transition can be interrupted by the transitions of the land we are trying to transition from or past the transitions of the country we are trying to transition to. The transitions from the state we are trying to transition to take the priority. -
Ordered Interruption:If set to imitation, this lets the transition be interrupted past other transitions independently of their order. If set to true,the order of the transitions matters.
-
In that location's more...
When you create an Animator Controller, you can run into three more nodes autonomously from your animation states:
-
Entry and Leave: This node is used when yous transition betwixt state machines (Animator Controllers or substate machines). We will discuss information technology in detail in the Using Sub-Country Machines in Animator Controller recipe inChapter 6, Handling Combat . -
Whatsoever state: This node can exist used as a helper to make a transition from whatsoever land to a given country. It is used when you take an blitheness that can be played anytime, for instance, a striking animation. Nosotros will discuss it in item in the Using transitions from any country to play hit reactions recipe inChapter 6, Handling Combat .
Using parameters to control the blitheness flow
You can define a set of parameters in an Animator Controller and use them to control the transitions between animation states in Mecanim. In this recipe, we will show how to utilize parameters for transition weather condition and utilize scripts to set values of those parameters in runtime.
Getting set
Before we beginning, you should prepare an Animator Controller with at least one transition between blitheness states. The controller should be assigned to a graphic symbol (its Animator component) placed in a scene. Yous tin likewise apply the provided example Unity project and go to the Affiliate 01 Working with animations\Recipe 05 Using parameters to control the animation flow directory. You will find anExample.unity scene there. There is a Warrior game object in the scene's Hierarchy . If you run the game and printing the space bar, the Warrior volition make a wave gesture. Yous can select the Warrior and open up his Animator Controller . If you lot click on the Idle | Wave transition, you volition be able to come across the transition condition.
How to do it...
To utilise parameters for decision-making state transitions, follow these steps:
- Open the
Animator Controllerasset. - Observe the
Parameterstab in the upper left corner of theAnimatorwindow and click on it. - Click on the plus icon in the
Parameterstab to add a new parameter. - Choose the
Triggertype for the parameter. - Type a name of the newly created parameter (in the provided instance, the name of the parameter is
Wave). - Click on the transition between states yous desire to utilise parameters for. In the provided example, it is the transition betwixt
IdleandWaveanimation states.Idleis the default country. - Become to the
Inspectortab and find theConditionssection.
- Click on the plus icon to add together a new status. If you take only ane parameter, it volition be called as the condition automatically. If you accept more parameters, you lot need to choose the proper one from a drop-down listing.

- If yous want to brand an firsthand transition between your animation states, make certain to disable the
Has Exit Timeoption, institute above theSettingsfoldout. - Your transition will have place merely when its conditions are met. You lot need to prepare the parameter using scripts.
- To create a new C# script, click on the right mouse button in the
Projection Viewand selectCreate|C# Script. Name the script every bit you wish (in the provided example, information technology'due south calledMoving ridge, the aforementioned as the parameter information technology sets). - Open the script and write the following:
using UnityEngine; using System.Collections; public class Wave : MonoBehaviour { //The anim variable is used to shop the reference //to the Animator component of the graphic symbol. private Animator anim; void Start () { //We get the component and assign it to //the anim variable when the game starts anim = GetComponent<Animator>(); } void Update () { //Nosotros check if player pressed the spacebar if (Input.GetKeyDown(KeyCode.Infinite)) { /*Nosotros cal the SetTrigger() function on the Animator component stored in the anim variable. The function requires one parameter - the proper noun of the trigger parameter set in our Animator Controller ("Wave" in our example). Make sure to match it with the name of the parameter you've created in your Animator Controller*/ anim.SetTrigger("Moving ridge"); } } } - Make certain your class name is the same equally the file name of the script, equally it won't compile otherwise.
- Assign the script to the character, to the aforementioned
Transformthat has theAnimatorcomponent with yourAnimator Controllerattached. Play the game and press the space bar; you should run into your graphic symbol switch to the next blitheness land.
How it works...
You can use several types of parameters and corresponding script functions to set them:
- Trigger : This is the simplest parameter. It is set to true with the
SetTrigger(string name)function called on theAnimatorcomponent object. It is reset past theAnimator Controllerafter information technology is consumed (used) by a transition. Thecord nameparameter of the function has to match your trigger parameter proper noun set in theAnimator Controller. - Int : This is an integer parameter. When you lot use it, you have to specify a logical comparing in the status. The transition will only occur if the value of the parameter meets the comparison condition with a given number. Yous can employ the
Equal,Greater,Less, andNot Equaloptions to compare the value of your parameter with the given number. Integer blazon parameters are prepare with theSetInteger(string name, int value)office. Thecord proper nameparameter needs to match the parameter proper noun set in the controller. Theint valueparameter is the value to set the controller parameter to. - Bladder : This is a float parameter. Information technology works the same as the integer type, but uses floating point numbers instead of integers. It is fix using the
SetFloat(cord proper noun, float value)function. - Bool : This is a Boolean parameter. The condition tin can check if the parameter is true or simulated. The value of the parameter is set up with the
SetBool(cord name, bool value)function.
At that place's more...
- You can add more than one condition to a state transition by clicking on the plus icon in the
Conditionssection in the transitionInspector. For the transition to occur, all its atmospheric condition accept to be met. It works as logical AND for the weather condition. - You tin also create more than one transition between the same states. To practise this, right-click on the state you want to transition from and cull the
Make Transitionchoice, and and so select the state you already have a transition to. A multi-transition is marked with three arrows instead of 1. If the conditions of whatsoever of the transitions are met, the transition will occur. You can apply it as logical OR for transition conditions.
- If y'all take more than i transition between states, you can only edit one of them at a time. To edit a transition, select it in the
Transitionssection of theInspector.

- If you want to remove a transition, select it in the
Inspectorand click on the minus icon, or select it in theAnimator Controllerand press Delete on the keyboard. Pressing Delete removes all the transitions.
- If y'all desire to remove a status from a transition, select information technology in the
Inspectortab and click on the minus icon. To select a condition, yous demand to click on the handle to the left of the condition driblet-down list (the handle looks like a = sign). - If you want to remove a parameter from the
Animator Controller, yous need to click on the handle on the left of the parameter and press the Delete button on the keyboard. You can also right-click on the parameter and choose theDeleteoption from the context carte.
Using animations from multiple assets
At times information technology is very user-friendly to separate animations to multiple assets. A common scenario is to have rigged models separated from animations or dissimilar animation types separated from each other (gainsay from movement, movement from deportment, actions from cut scenes, and and so on). This recipe shows how to do information technology for both Humanoid and Generic rigs.
Getting set
Earlier we start, you should prepare and import at to the lowest degree ii assets containing animations. If you are using a Generic rig, brand certain to take the same rig in both assets. You can too apply the provided example Unity projection and get to theChapter 01 Working with animations\Recipe 06 Using animations from multiple assets. At that place is a scene chosenInstance.unity file there. In the scene Hierarchy yous can find a Graphic symbol game object. It has an attached Animator Controller in which you can find ii animations: Idle and Wave . In the Rigs directory, you will find theGraphic symbol.fbx asset containing only a rigged graphic symbol along with theIdle.fbx andMoving ridge.fbx avails containing the respective animations.
Notation
If you are exporting FBX files from Blender, brand sure to disable the Add Leaf Basic option in the exporter . If you lot are exporting only the rig and animations (without a mesh), add an empty object to the scene. If you will not do this, your rig could exist messed up a bit after import.
How to do information technology...
To use animations from multiple assets, you lot need to follow these steps:
- Import the files to Unity.
- If you are using the Generic rig, yous take to fix the
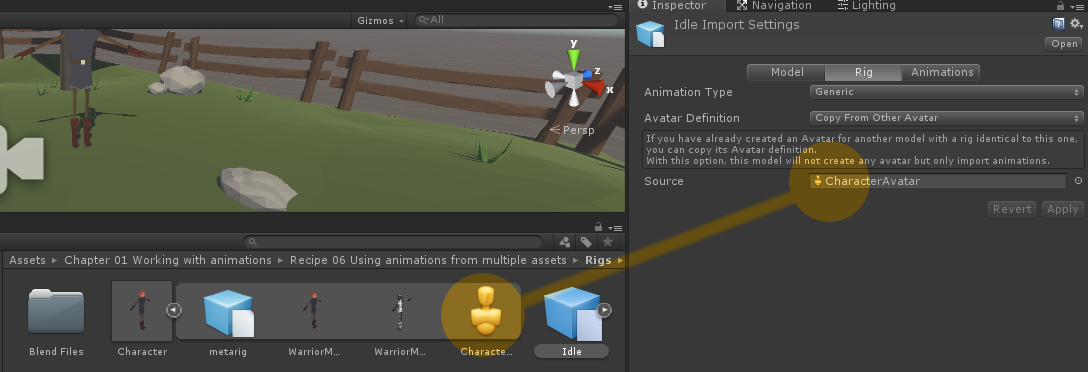
Avatar DefinitiontoCreate From This Modelon your grapheme (or reference graphic symbol if you programme to accept multiple characters with the same rig). For each imported animation asset, set theAvatar DefinitiontoCopy From Other Avatarand choose the avatar of your graphic symbol or reference graphic symbol. To do and so, you demand to unfold the character asset, find the avatar, and drag and drop it to theSourcefield in theInspectortab.
- If y'all are using a
Humanoidrig, you don't accept to copy theAvatar Definition(y'all still can if your rigs are exactly the same; that way you will have fewer avatars in your projection, making information technology easier to discover the ones you need). - Create or open up an
Animator Controller. - Assign animations from dissimilar files and build transitions betwixt them.
- Run the game to run across the animations work.
How it works...
All Generic rigs tin use animations from multiple assets that share the same Avatar Definition . To share the same Avatar Definition , Generic rigs have to have exactly the aforementioned rigs (the same hierarchy, the same os names and transforms). All Humanoid rigs tin can use animations from multiple assets that are also set to Humanoid . Additionally, they don't need to take the same rigs considering Unity automatically retargets all humanoid animations.
Looping, mirroring and offsetting the animations
Unity allows editing the animations to some extent afterward they're imported. Information technology can salve a lot of work and greatly speed up your workflow.
Getting ready
Before we start, you should prepare and import a Humanoid rig with at least one animation. You tin also use the provided example Unity project and get to theChapter 01 Working with animations\Recipe 07 Looping mirroring and offsetting animations directory. There is a scene calledExample.file in that location. In the scene Hierarchy , you lot can find a Mirror game object. It has an attached Animator Controller in which you tin can find two animations: Moving ridge and WaveMirror . In the Rigs directory, yous will find theMirror.fbx asset. If you select it and go to the Inspector , and to the Animations tab, you can observe normal and mirrored animation examples, also as looped blitheness examples ( Idle and IdleMirror ).
How to exercise it...
To gear up an animation to loop , you lot need to become through the following steps:
- Select the animated asset and get to the
Animationstab. - Check the
Loop Timecheckbox and click on theApplypush. The animation is looped. - If your animation's first and concluding frames don't match perfectly, you lot can force them to match with the
Loop Posecheckbox. It is not recommended to use this selection for animations that accept matching first and last frames.
To offset an animation, you need to go through the following steps:
- Select the blithe asset and become to the
Animationstab. - Select your blitheness and make it loop (
Loop Timecheckbox). - Enter a value in the
Cycle Beginningfield, below theLoop Posecheckbox. - Click on the
Applybutton.
To mirror an animation, you lot need to go through the following steps:
- Select the blithe
Humanoidasset and get to theAnimationstab. - Find the
Mirrorcheckbox on the bottom of the animation settings. - Bank check the
Mirrorcheckbox and click on theEmploybutton. The blitheness is mirrored. - Mirroring animations works simply for
Humanoidrigs.
How it works...
- Looping animations : This is a common technique used for all cyclic movements (walk and run cycles, idle animations, and and so on). If you don't fix an animation to loop, information technology volition play once and freeze on the last frame.
- Offsetting blithenesss : Sometimes it is convenient to offset the bicycle of a looped animation. It is often used with the
Mirrorpick for steering animations (clips used to turn the grapheme while moving). We will be showing that in the Using root move to steer a grapheme recipe inChapter 4, Grapheme Movement . - Mirroring animations : This option works but with
Humanoidrigs. It is used to flip the animation left to correct and can salve up to 50 percent of steering animations when combined with theOffset Cyclepick.
There'south more than...
You can besides mirror and showtime animation states in the Animator Controller . If yous select an blitheness state and become to the Inspector tab, you tin can observe the Mirror and Cycle First options. There is too an option to utilise Animator Controller parameters to switch the Mirror option on and off and set the Bicycle Offset . You demand to have a Boolean parameter defined for the Mirror option and a float parameter for the Cycle Outset . Those settings volition be automatically synchronized with the parameters. Whenever you change a parameter value, the setting volition too be changed.
Adjusting the playback speed of animations
Unity allows you to ho-hum downward and speed the animation playback in the Animator Controller . You lot can do it in runtime with scripts to achieve interesting effects, for instance, slow motion.
Getting ready
Before we start, you should prepare and import a rig with at least one animation and create an Animator Controller with at to the lowest degree one animation state for it. Yous can besides apply the provided example Unity project and go to theChapter 01 Working with animations\Recipe 08 Adjusting the playback speed of animationsdirectory. At that place is a scene calledExample.unity in that location. In the scene Hierarchy , you can find and AdjustSpeed game object. It has an fastened Animator Controller in which you tin can find two animation states: WaveSpeedNormal and WaveSpeedIncreased . There is also an AdjustSpeedByScript game object in the scene. Y'all can increment the playback speed of its animations past pressing the Space button on your keyboard in runtime.
How to do it...
To change the animation playback speed, follow these steps:
- Open an
Animator Controller. - Select an blitheness state.
- Go to the animation state Inspector and discover the
Speedparameter beneath theMovementfield. - Enter a number in the
Speedparameter to change the playback speed.
How information technology works...
The Speed parameter set for an blitheness state in the Animator Controller multiplies the speed playback of the blitheness state. Setting this parameter to cypher will freeze the animation.
At that place's more...
You can as well set the parameter using scripts. Following is an example script (it is used by the AdjustSpeedByScript game object in the providedExample.unity). Yous can assign it to your animated game object that has the Animator component and an Animator Controller attached:
using UnityEngine; using System.Collections; public grade AdjustSpeedByScript : MonoBehaviour { //This is a variable, in which we store the reference to the Animator component private Animator anim; //We store the wanted animation speed in this variable, the default value is two (200%). public float newAnimationSpeed = 2f; void Showtime () { //At the start of the game we assign the Animator component to our anim variable anim = GetComponent<Animator>(); } void Update () { //We check if role player pressed the Space button if (Input.GetKeyDown(KeyCode.Space)) { //And set the playback speed of the whole Animator Controller (it multiplies all states animation playback speed) anim.speed = newAnimationSpeed; } } } If you want to modify the speed of just one animation land, then add a bladder parameter to your Animator Controller , utilise this parameter in the Multiplier field in the blitheness state Inspector , and change the parameter with scripts using the post-obit function:
anim.SetFloat(cord name, float value);
Here name is the name of your parameter in the Animator Controller andvalue is the float value you desire to set the parameter and playback speed to.
Using override animator controllers to animate unlike types of characters
If you have multiple types of character in your game, most probably y'all would similar to be able to share the animation states logic between them and simply replace the blitheness clips. Imagine that you take several types of enemies, and their combat logic is the aforementioned (they have attacks, move, hit reactions, and so on) simply they use different blitheness clips. For such situations, Override Animator Controllers come in handy.
Getting ready
You should accept at least two characters with different animation clips ready and imported into Unity. You can also download the provided example Unity project and go to the Chapter 01 Working with animations\Recipe 09 Using override animator controllers to breathing dissimilar types of characters directory. There is a scene calledExample.unity at that place. If you lot open it, you lot'll find Warrior and Spider game objects in the Hierarchy . They take Override Animator Controllers fastened, and you tin examine them. If yous run the game, the characters will play assail animations. The underlying logic is divers in the HumanCombat controller (constitute in the Animator Controllers directory). The Warrior game object uses the HumanCombat controller without overriding it, the Spider game object uses a SpiderCombat override controller.
How to do it...
To apply Override Animator Controllers , follow these steps:
- Create a normal
Animator Controllerthat will be used as the reference controller containing the logic of animation states. In the provided case, it is theHumanCombatcontroller, created withWarrioranimations. - Y'all can attach this controller to your first graphic symbol (its
Animatorcomponent) and use it every bit previously. - Create an
Override Animator Controllerby correct-clicking on theProjection Viewand choosingCreate|Override Animator Controller. - Select the newly created override controller and go to the
Inspectortab. - Elevate and drib your original/reference
Animator Controllerto theControllerfield of the newly created override controller. - You will run into all your original animation clips listed on the left and fields for overriding those animation clips.
- Drag and drop the blitheness clips from your 2nd graphic symbol to the override fields corresponding with original blitheness clips of your first character. In the provided instance,
Mananimations are replaced withSpideranimations. - Assign the
Override Animator Controllerto theControllerfield of theAnimatorcomponent of your 2nd character.
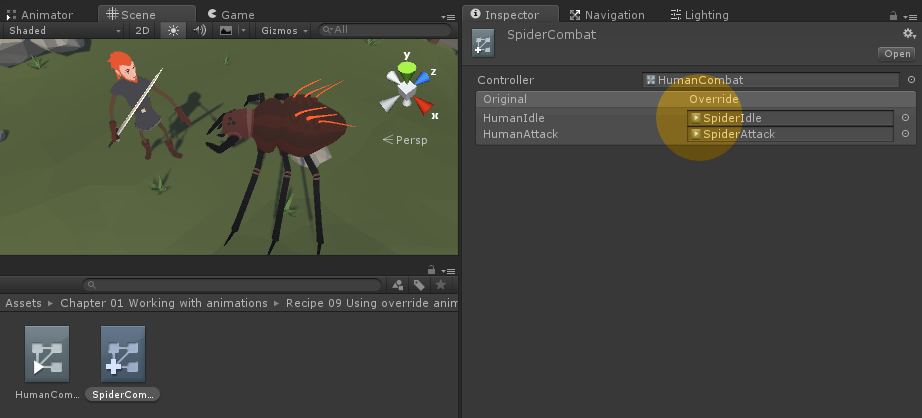
How information technology works...
Override Animator Controller only replace animation clips from your original Animator Controller . The logic of the original controller stays the same (so you tin also use the same scripts to set the same parameters and so on). It is extremely useful for creating NPC characters in your games. You create the Animator Controller one time, you write the scripts driving the controller once and merely change the animations.
Notation
Your original Animator Controller has to take animation clips. You cannot override empty blitheness states.
Importing object blitheness from a 3D package
In Unity, you can import not only skeletal blitheness but also object transform animation. It can be useful for creating complex movements, for case, an object following a path.
Getting prepare
You have to animate an object's translation, rotation, or scale in a 3D parcel, so export the object as FBX file. Yous can as well download the provided case Unity project and go to the Chapter 01 Working with animations\Recipe 10 Importing object animation from a 3D package directory. There is a scene calledInstance.unity in that location. This object has a follow path blitheness created in Blender and exported to FBX file. Information technology has a normal Animator Controller with that animation as default state (looped). You can run the game to see the object animate.
How to do information technology...
To import object blitheness, follow these steps:
- Animate an object in a 3D package (translation, rotation, and calibration animations are supported).
- Import the object into Unity and select the
Genericrig blazon. - You can adjust animation settings ordinarily (loop an animation for instance).
- Create an
Animator Controllerand drag and drop ane of the imported animations into theAnimatorwindow to create a default blitheness state. - Place your blithe object into a scene and assign the controller to the
Animatorcomponent of the object. - If you lot run the game, the object will exist animated.
How information technology works...
Unity imports translation, rotation, and scale blitheness of 3D objects from a 3D parcel. Information technology makes it easy to create complex animations and employ advanced features of a chosen 3D software. Make sure to bake your animations into frames before importing them to Unity (Blender bakes the exported animations to frames by default). Importing mesh animation (vertices movement) is non supported (you have to apply Alloy Shapes instead; we volition hash out them in detail in the Animating facial expressions with Blend Shapes recipe inChapter 5, Character Actions and Expressions ).
Learned a lot from the volume.
Source: https://www.packtpub.com/product/unity-5-x-animation-cookbook/9781785883910
Posted by: hollandthomfor.blogspot.com
0 Response to "How To Make Animations In Unity 5"
Post a Comment